Install Philips Hue Gradient or Govee T2 on 65-inch TV
You buy a massive, gorgeous 65-inch display. The contrast is crisp, the colors are vibrant, and the thin bezel makes the image feel like it is floating in mid-air.
Ambient backlighting bridges the gap between the glass and your room, projecting saturated, real-time colors that expand the visual boundaries of what your display can do. Two heavyweights dominate the conversation: the ultra-premium Philips Hue Play Gradient Lightstrip and the high-octane, camera-assisted Govee Envisual T2. Choosing between them is not just about choosing a brand. It is about choosing two entirely different philosophies of light — and knowing how to verify that your setup, your TV, and your room can actually support the one you pick.
---
The Architecture of Reactive Lighting: HDMI Sync vs. Camera-Based Capture
The fundamental difference between these two systems lies in how they read the colors on your screen. They process visual data through entirely different pathways, resulting in distinct visual textures on your wall.
| Feature | Philips Hue Play Gradient | Govee Envisual T2 |
|---|---|---|
| Color Capture Method | HDMI Sync Box (digital signal injection) | Dual-camera (optical capture from glass) |
| Setup Complexity | High — requires Sync Box and Hue Bridge | Moderate — requires camera mount and calibration |
| Source Compatibility | External HDMI sources only | All sources, including built-in Smart TV apps |
| Visual Latency | Near-zero (digital parsing) | Minimal — slight processing lag, usually under 50 ms |
| Maximum Colors | 16 million | 16 million |
| Price Floor (65-inch kit) | ~$350–$450 with Bridge and Sync Box | ~$80–$130, camera kit included |
The Philips Hue Gradient system relies on direct digital injection. It intercepts the video signal before it even reaches your screen. Using the Philips Hue Play HDMI Sync Box, it analyzes the raw data stream — pixel by pixel, frame by frame — and instantly translates that into light commands sent over Zigbee to the strip. Because it reads the digital code directly, the color matching is incredibly crisp and accurate. When a lightsaber ignites on the left side of the screen, a matching, highly saturated beam of light explodes onto your wall with near-zero latency. It is clean, precise, and perfectly synchronized.
Govee takes a completely different path. The Govee Envisual T2 uses physical eyes: a dual-camera system mounted on top of your TV, looking down at the glass. It captures the actual light emitting from your display, processes the image through onboard algorithms, and commands the lightstrip to react. It is an optical translation rather than a digital one. While this sounds less direct, it means the Govee T2 does not care where the video comes from. Whether you are playing a game on a console, streaming through a built-in Smart TV app, or watching a local broadcast, the camera sees it and reflects it. The visual output is incredibly dynamic and saturated, even if it occasionally lacks the mathematical precision of Hue's HDMI-parsed data.
---
Hardware Requirements and Ecosystem Integration for Philips Hue
Going the Philips Hue route is a commitment to a premium, deeply integrated ecosystem. You cannot simply buy the lightstrip, stick it to the back of your 65-inch panel, and expect it to dance with your movies. It requires a carefully coordinated chain of hardware to unlock its true power — and understanding this chain upfront is the difference between a smooth install and a frustrating return.
The three mandatory components:
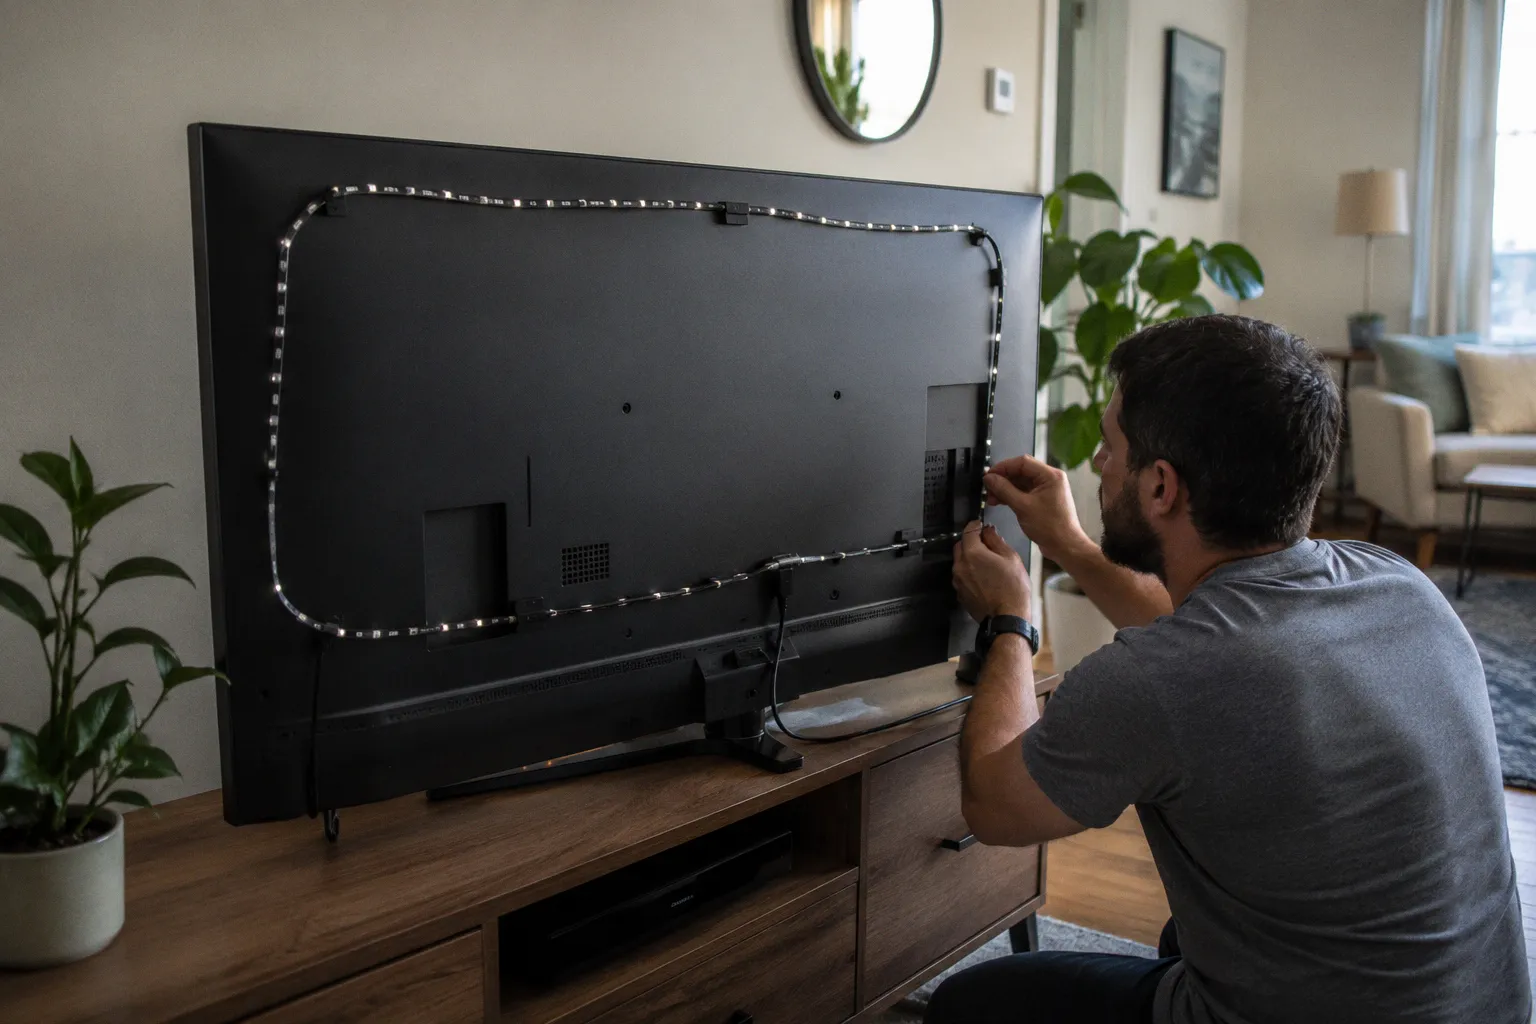
1. Philips Hue Play Gradient Lightstrip (65-inch model) — This strip is thick, diffuse, and engineered with distinct internal zones that project multiple colors simultaneously along a single continuous band. The 65-inch version is specifically sized for panels between 55 and 65 inches diagonally, and its curved profile hugs the back of the TV at a deliberate angle.
2. Philips Hue Bridge — The Bridge acts as the brain of your lighting ecosystem, communicating via Zigbee protocol rather than Wi-Fi. This matters because Zigbee operates on a mesh network: each Hue device strengthens the signal for the next, keeping your lights perfectly in sync without bogging down your home router. The Bridge supports up to 50 lights and handles the computational load of real-time color parsing.
3. Philips Hue Play HDMI Sync Box — This is the engine that makes reactive lighting work. It has four HDMI input ports and one output port. Your media sources — Apple TV, PlayStation 5, Blu-ray player, cable box — plug into the inputs, and a single HDMI cable runs from the Sync Box output to your TV. The Sync Box intercepts the raw video data and broadcasts color commands to the Bridge, which relays them to the Gradient strip.
The Philips Hue ecosystem delivers an unmatched, lag-free sensory experience, but it demands a dedicated hardware chain that fundamentally changes how your media console operates.
The critical workflow: You must run every media source through the Sync Box. If you rely on your TV's built-in Netflix or Disney+ app, the Hue system is blind to that content — the signal never passes through the Sync Box, so the strip stays static. Before committing to Hue, audit your viewing habits. If the majority of your content comes from native Smart TV apps, Hue will leave you frustrated unless you pair it with an external streaming device.
Once connected, the Hue app allows you to build an "Entertainment Area." Within this digital workspace, you drag and position icons representing each light — the Gradient strip, any additional Play bars, even overhead Hue bulbs — to match their real-world locations around your TV. The app uses this spatial map to direct precise color data to each zone, creating an immersive bubble of light that wraps around your viewing position.
Ecosystem depth: Because the Gradient strip lives within the broader Hue ecosystem, you can extend the ambient lighting experience beyond the TV. Add a pair of Hue Play light bars flanking the display, or position a Hue Go on the shelf behind your couch. The Sync Box and Entertainment Area will drive all of them in concert, projecting the same reactive color data across every light source. It is expensive, but the spatial immersion is something no camera-based system can replicate.
---
Calibration and Setup Workflow for the Govee Envisual T2
If Hue is a digital symphony, the Govee Envisual T2 is a hands-on art project. Because Govee uses a dual-camera system to read the screen, the physical setup and calibration process are critical to achieving a balanced, immersive glow. Rush this step, and the colors will be off for every movie you watch.
The installation sequence:
1. Clean the back panel of your TV with isopropyl alcohol wipes to remove dust, oils, and any residue that could compromise adhesion.
2. Mount the dual-camera unit firmly on the top-center of the TV bezel. The camera must sit level and centered — even a few millimeters off-center creates uneven color mapping on the edges.
3. Route the lightstrip along the back of the TV, looping the corners gently. Govee includes extra-length segments specifically designed for 65-inch panels to prevent tension at the bends.
4. Place the orange foam calibration squares on the four corners and along the edges of the screen.
5. Open the Govee Home app and follow the guided camera calibration — drag the on-screen mapping points to align with the foam squares and screen boundaries.
6. Remove the foam squares and fine-tune white balance, saturation, and brightness in the app settings.
The calibration step deserves extra attention. When you open the Govee Home app, you will see a distorted, wide-angle view of your TV screen captured through the camera's lenses. Your job is to drag the digital calibration points on your phone screen to align perfectly with the corners of your TV and the orange foam squares. This tells the Govee processor exactly where the screen ends and the bezel begins — essentially teaching the camera the physical boundaries of your display.
After removing the foam squares, you are left with a highly reactive system. Spend real time adjusting the white balance in the app. Different TV panels produce slightly different color temperatures — OLED tends toward cooler whites, while QLED can skew warm — and different wall paint tones absorb or shift color in their own ways. Calibrating the white balance ensures that a white screen translates to clean white light on your wall, rather than a muddy blue or warm yellow creeping into every scene.
A practical tip for 65-inch panels: The larger the screen, the more the camera has to work to maintain color accuracy at the far edges. During calibration, zoom into the corner mapping points and make sure they are precisely aligned. A sloppy corner calibration on a 65-inch set is far more noticeable than on a 43-inch screen, because the lightstrip projects a wider spread of color from each edge.
---
Performance Trade-offs: HDMI 2.1 Compatibility and Native App Limitations
When deciding which path to take, you must look closely at how you actually consume content day to day. The technical limitations of each system will directly impact your daily viewing experience — and the wrong choice can turn an expensive investment into a source of daily annoyance.
The Philips Hue HDMI Sync Box supports HDMI 2.0 and 2.1 pass-through, handling high-end video signals up to 4K at 60Hz or 1440p at 120Hz. For competitive gamers who demand 4K at 120Hz — the native output of a PlayStation 5 or Xbox Series X — passing the signal through the Sync Box introduces a bottleneck. The Sync Box's maximum throughput caps your display's refresh rate, which means you may have to choose between reactive lighting and peak gaming performance. Philips has released firmware updates improving compatibility, but the fundamental hardware constraint remains.
The larger limitation is source dependency. Because the Sync Box only reads what flows through its HDMI inputs, it cannot see content from native Smart TV apps. If you open Netflix directly from your LG, Samsung, or Sony TV's built-in operating system, the Gradient strip goes dark or reverts to a static color. This single limitation makes an external streaming device — an Apple TV 4K, Chromecast with Google TV, or Nvidia Shield — essentially mandatory for anyone who wants the lights to react to everything they watch.
Govee's camera-based system bypasses all HDMI limitations. It does not care about refresh rates, HDCP copy protection, or whether the video comes from a console, a cable box, or a built-in Smart TV app. If there is an image on the glass, the camera captures it and projects the corresponding color. For users who primarily watch content through their TV's native apps, this is a decisive advantage.
Govee offers ultimate input freedom, capturing colors from any source on the glass, but it remains vulnerable to ambient room reflections and lighting conditions.
However, the optical approach has its own vulnerability: ambient light contamination. If you have a lamp on in the room, or if sunlight streams through a window and reflects off your TV screen, the Govee camera will read that reflection as part of the on-screen image. A bright yellow lamp reflection in the corner of your screen will cause the strip to project yellow light onto the wall, even if the movie scene is set in a dark blue ocean. The workaround is straightforward — dim or redirect ambient light sources during viewing — but it is a constraint that the Hue system never faces because it reads the raw digital signal, not the light bouncing off the glass.
Smart home integration is another consideration. Both systems connect to major voice platforms — Apple HomeKit, Google Home, and Amazon Alexa — but the depth of integration differs. Philips Hue, backed by years of ecosystem development, offers granular automation: you can trigger lighting scenes based on time of day, geofencing, or specific app launches. Govee's smart home hooks are improving but remain more basic, primarily offering on/off and brightness control through voice commands. If your home is already wired into a sophisticated automation routine, Hue slots in more naturally.
---
Mounting Dynamics and Adhesive Longevity on 65-inch Panels
The physical installation of these lightstrips on the back of a 65-inch TV requires careful handling. A 65-inch screen offers a wide canvas — roughly 57 inches across and 32 inches tall — but the back panel of modern TVs is rarely flat. You will encounter plastic ridges, ventilation grilles, port housings, and uneven surfaces that complicate adhesion and routing.
Philips Hue mounting approach: The Gradient strip ships with heavy-duty, angled plastic mounting brackets. You adhere these brackets to the corners and sides of your TV's back panel using the included adhesive pads, then press the thick silicone lightstrip into the bracket channels. The brackets hold the strip at a precise 45-degree angle away from the TV chassis. This angle is crucial — it flings the light outward and backward toward the wall, creating a beautifully blended, diffuse halo rather than a harsh, concentrated line of light hugging the bezel. The bracket system also means the strip is not permanently bonded to the TV; if you upgrade your display in the future, you can unclip the strip and remount it on a new panel with fresh brackets.
Govee mounting approach: Govee uses a flat, adhesive-backed strip that you apply directly to the TV chassis. Because it mounts flush, routing around the corners of a 65-inch panel demands patience. The strip includes extra slack at each corner, but you must loop it gently to avoid crimping the internal LED circuitry. Sharp bends can damage the copper traces inside the strip, creating dark spots where LEDs fail to illuminate. On a 65-inch TV, the corners span a wider radius than on smaller sets, which actually works in your favor — the gentler curve reduces the risk of over-bending.
Adhesion is everything. Before peeling off any backing, clean the entire perimeter of the TV's back panel with isopropyl alcohol. Manufacturing oils, dust, and static-charged particles all compromise adhesive grip. Modern TVs generate heat through their internal components, and that heat slowly dries out cheap adhesives over months of use. Starting with a pristine, oil-free surface is the single most important step for keeping the strip from sagging or peeling six months down the line.
If you want extra insurance, consider supplementing the factory adhesive with small cable-management clips or thin adhesive cable ties at strategic points — especially along the bottom edge of the TV, where gravity pulls hardest on the strip. This is especially important for 65-inch and larger panels, because the longer strip length means more cumulative weight acting on each adhesive point.
---
Optimizing the Room for Maximum Immersion
The best lightstrip in the world will look washed out if the physical room dynamics work against it. Before you even plug in the system, take stock of three environmental factors that make or break the visual impact.
Wall color matters enormously. A neutral white or light gray wall acts as the perfect projection surface, reflecting saturated colors exactly as the lightstrip intends. If your wall is painted a dark color — navy, charcoal, deep green — it will absorb the light rather than reflect it. You can compensate by cranking brightness to maximum, but you sacrifice the subtle gradient transitions that make reactive lighting feel cinematic. If repainting is not an option, hang a lightweight white fabric panel or even a large white poster board directly behind the TV to create a dedicated reflection zone.
Distance between TV and wall shapes the glow. For the most immersive diffusion, aim to position your TV between 6 and 12 inches away from the wall. If the display is flush-mounted or nearly touching the surface, the light projects as a sharp, intense band around the screen's perimeter rather than a soft, sweeping halo. The added distance allows the light to spread and blend before it hits the wall, creating that signature ambient glow that makes the screen appear to float. Most VESA-compatible TV mounts include standoffs or extension arms that can add this spacing.
Brightness calibration is scene-dependent. When watching dark, cinematic content — noir films, horror, space operas — drop the lightstrip brightness to 30–40%. This prevents the ambient light from overpowering the shadows on screen, keeping your eyes focused on the action while the subtle backlight adds depth. For bright, colorful content — animated films, sports, nature documentaries — push brightness to 70–80% to let the full spectrum bloom across the wall. Most apps let you save brightness presets, so switching between profiles takes a single tap.
The payoff is worth the setup effort. Once the hardware is installed, calibrated, and the room is tuned, your 65-inch display stops being a glowing rectangle on a flat wall and starts feeling like a window into a space that extends beyond the frame — exactly what reactive ambient lighting was designed to deliver.